Overview
Introduction
Most market tops don't look like tops while they're forming.
Price moves sideways. It rallies briefly, then fades. Buyers keep stepping in, expecting the uptrend to continue. That sideways churn is exactly what Wyckoff distribution describes, a process where larger sellers use late buying demand to quietly reduce their own exposure before a breakdown.
The pattern typically appears after a long price advance, when price stops trending cleanly and starts thrashing around in a volatile range. It doesn't prove a crash is coming. It doesn't work like a trading signal you can act on blindly.
What it does is give traders a shared vocabulary for studying supply, demand, volume, and failed rallies together, instead of reading any one of those things in isolation.
In crypto, that vocabulary matters more than it might elsewhere. Leverage, fragmented liquidity across dozens of exchanges, and round-the-clock trading all add noise to the pattern. Understanding where Wyckoff distribution works, and where it breaks down, is just as important as learning the phases themselves.
Key Takeaways
- Wyckoff distribution describes a topping range where selling pressure gradually overwhelms buying pressure.
- The pattern is useful only when price action, volume, and failed follow-through point in the same direction.
- Crypto markets distort Wyckoff signals through leverage, fragmented liquidity, thin order books, and nonstop trading.
- A confirmed setup still does not make shorting safe or guarantee markdown.
How Wyckoff Distribution in Crypto Forms at a Market Top?
Wyckoff distribution forms when an uptrend loses momentum and a trading range starts absorbing demand near the highs. Buyers still see strength. But larger sellers, think funds, early investors, miners, and market makers, use that buying interest to reduce exposure without immediately collapsing the market.
The framework comes from Richard D. Wyckoff's early 20th-century work in technical analysis. Wyckoff used the “Composite Man” as a mental model for collective market behavior, a stand-in for the aggregate decisions of all large holders. In crypto, it's more useful as shorthand for collective supply behavior than as evidence that one hidden actor is controlling the chart.
Before calling a range distribution, several conditions usually need to line up:
- A prior uptrend or strong markup phase leading into the range.
- Repeated failure to hold above resistance after rallies.
- Rallies that require more effort for less and less upside.
- Recoveries that start closing progressively lower inside the range.
- A break or failed recovery that confirms supply has taken control.
The pattern sits inside the broader context of crypto market cycles, where distribution often appears near the late stage of a markup phase. That's when momentum buyers, breakout traders, and leveraged longs still provide the demand that larger sellers need to distribute into.
Liquidity is part of the reading too. Market makers break large orders into smaller flows, which is why price can churn near a top without one dramatic sell event. That churning can look like manipulation. But the chart question is simpler: is supply consistently meeting demand at the top of the range, and is demand starting to lose those tests?
The Wyckoff Distribution Pattern Step by Step
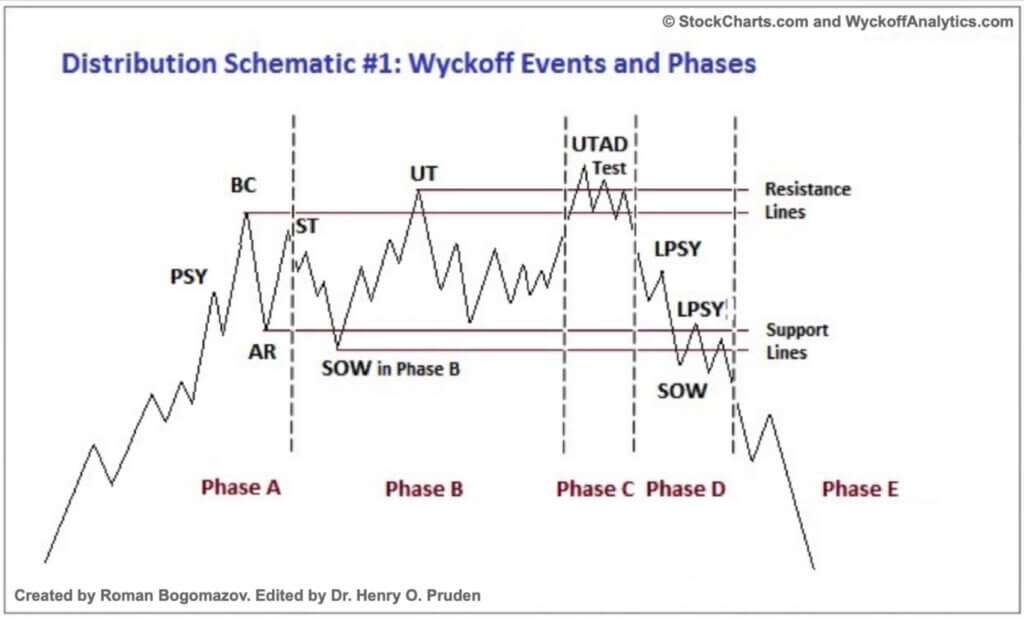
The Wyckoff distribution pattern is a five-phase range. It starts with an uptrend losing force and ends, if confirmed, with markdown. The phases create a sequence that's useful for organizing what you see, but real crypto charts often compress, stretch, or skip textbook details entirely.
The table below maps each phase to its defining behavior. Treat it as a checklist, not a guarantee.
| Phase | What To Look For |
|---|---|
| Phase A | Uptrend stalls, heavy demand meets heavier supply, and the first range boundaries form. |
| Phase B | Price moves sideways while buyers and sellers test the range repeatedly. |
| Phase C | A false breakout or UTAD traps late buyers above resistance. |
| Phase D | Price starts failing on rallies and shows weakness near support. |
| Phase E | Price leaves the range lower and markdown begins if sellers keep control. |
The pattern gains credibility when the phases show a change of character, meaning the market's behavior is visibly different from the uptrend that preceded it. A range that simply pauses and resumes higher may be reaccumulation, not distribution. The confirmed Phase E can lead into bear market conditions, but that label should follow evidence, not front-run it.
Phase A: The Uptrend Stalls
Phase A is the first sign that the prior uptrend is no longer moving cleanly. Price may push to a new high, but volume expands without meaningful follow-through. Early supply begins appearing into that buying.
The main events in Phase A are preliminary supply, buying climax, automatic reaction, and secondary test. The buying climax usually sets the upper boundary of the range, while the automatic reaction, a sharp pullback from that high, helps define support below. The secondary test then returns to the highs to check whether demand can still defend that level. If it can't hold on lower volume, the range is becoming established.
Phase B: The Trading Range Builds
Phase B is the extended testing area where distribution is genuinely difficult to separate from ordinary consolidation. Price swings in both directions because sellers still need demand to distribute into, and buyers still believe the uptrend can continue.
This is where many traders force the label too early. A range that shows sharp two-sided action isn't automatically distribution. Until repeated failed rallies and progressively weaker recoveries become the pattern, the range may still be reaccumulation or a normal pause before continuation.
Phase C: The Upthrust Trap
Phase C is where an upthrust or upthrust after distribution can appear above resistance. A UTAD is a late false breakout that attracts buyers, triggers breakout entries, and then fails back into the range, closing below the resistance level that briefly looked broken.
The failure is what makes the UTAD meaningful, not the wick itself. If price breaks above resistance and holds on follow-through buying, the bearish read weakens. If it breaks out, stalls, and reverses back inside the range on weak volume, the trap becomes more credible and Phase C is worth marking.
Phase D: Weakness Takes Control
Phase D begins when sellers start winning the tests that buyers had previously defended. Price breaks below support, bounces weakly, then fails to reclaim the middle of the range on the recovery attempt.
The last point of supply is often watched in this phase. It's the weak rally that follows clear downside evidence, typically showing up as a lower high that attracts selling quickly. It's a descriptive label, not a prescriptive entry point.
Phase E: Markdown Begins
Phase E is the confirmed breakdown phase, where price leaves the range lower and sellers maintain control after the break. A convincing Phase E shows failed recovery attempts on multiple timeframes, not just one dramatic candle followed by a bounce.
Even here, markdown is a scenario under development, not a certainty. Crypto markets can reverse sharply if liquidity shifts, short positioning becomes overcrowded, or a broader catalyst brings fresh demand back into the market.
Wyckoff Distribution Events and What They Signal
Wyckoff distribution events are labels for changes in supply and demand as a top forms. They help describe what price is doing at specific moments in the range, but the labels are only meaningful when the broader context supports the same interpretation.
The events below follow a typical sequence. Real charts are messier, and shorter timeframes produce extra noise around the same broad structure.
| Event | Signal |
|---|---|
| PSY | Early selling appears during the late uptrend. |
| BC | Buying climax marks an emotional high and heavy volume. |
| AR | Automatic reaction shows the first sharp supply response. |
| ST | Secondary test checks whether demand can revisit the highs. |
| UT | Upthrust briefly pushes above resistance and fails. |
| UTAD | Late false breakout traps buyers after distribution has begun. |
| SOW | Sign of weakness shows supply pressing through support. |
| LPSY | Last point of supply marks a weak recovery attempt. |
Not every distribution range contains every textbook event. Some tops never produce a clear UTAD. Others show multiple upthrusts, or a breakdown that reclaims the range quickly and resets the count. A single event label without supporting context is just a guess.
The events are most useful as a sequence of evidence. If the BC, AR, ST, and UT all appear in order and each one shows progressively weaker demand, the SOW and LPSY carry more weight when they arrive. If the sequence is incomplete or forced onto the chart, the labels don't add much.
How Volume Confirms or Rejects Distribution
Volume confirms distribution when it shows that price is struggling to rise and falling more easily as the range matures. In Wyckoff terms, this is the effort-versus-result principle: rising volume on a rally that makes little progress suggests supply is absorbing demand. Expanding volume on a decline suggests buyers are losing control of the range.
Crypto volume requires extra caution before drawing conclusions. Spot volume is fragmented across dozens of venues, derivatives activity can drive short-term moves in ways that don't reflect real supply or demand, and illiquid tokens can print large volume bars without meaningful depth behind them.
A practical volume read checks several things together rather than relying on a single bar:
- Rallies that require rising volume but produce limited upside progress.
- Declines that expand on volume and close near the lows of the move.
- Breakouts above resistance that fail to hold despite visible buying interest.
- Rising open interest as the range becomes more crowded with positions.
- Elevated funding rates that show aggressive long positioning accumulating.
- Order book depth thinning near key resistance and support levels.
Volume can also reject the bearish case. If a suspected UTAD reclaims resistance and volume continues to support the move higher, the setup may be a continuation breakout rather than a top. Letting volume update the read matters as much as using it to confirm the initial thesis.
Wyckoff Distribution vs Accumulation, Reaccumulation, and Redistribution
Wyckoff distribution is often misread because the same sideways range can resolve in completely different directions. The range shape alone doesn't tell you which label applies. Prior trend, failed moves, volume behavior, and eventually the breakout direction are what separate distribution from the others.
| Setup | Typical Outcome |
|---|---|
| Distribution after markup | Supply absorbs demand and may lead to markdown. |
| Accumulation after markdown | Demand absorbs supply and may lead to markup. |
| Reaccumulation inside an uptrend | Price pauses before the larger uptrend resumes. |
| Redistribution inside a downtrend | Price pauses before the larger downtrend resumes. |
A trader who labels a reaccumulation range as distribution may short into the continuation of an uptrend. A trader who labels redistribution as accumulation may buy into the continuation of a downtrend. The middle of any range looks ambiguous, and forcing a label too early is one of the most consistent mistakes in Wyckoff-based analysis.
Wyckoff Distribution vs Accumulation
Distribution and accumulation are structural opposites. Distribution is a potential topping range after a markup. Accumulation is a potential bottoming range after markdown. Both involve tests, false moves, and changing volume, which is why the same event names appear in both frameworks.
Supply being absorbed before markdown looks different from demand absorbing supply before markup, but only if the prior trend is part of the analysis. Looking at the range in isolation often produces the wrong label.
Wyckoff Distribution vs Reaccumulation
Distribution and reaccumulation can look nearly identical until the range resolves. Both can form after an uptrend. Both can shake out late traders with false moves. Both include failed breakout attempts and sharp reversals within the range.
What separates them is follow-through. Reaccumulation should reclaim resistance, hold above it, and continue to new highs. Distribution should fail rallies progressively, break support, and struggle to recover that level. Labeling too early, before that follow-through is visible, means working with incomplete information.
Wyckoff Distribution vs Redistribution
Redistribution forms during a larger downtrend, not after a fresh markup. It's a pause where sellers reload before another move lower, and it can look like accumulation to a trader who isn't tracking the higher-timeframe trend.
| Signal | Why It Can Mislead |
|---|---|
| Sideways range | It may be pause, top, bottom, or continuation. |
| High volume high | It may be climax buying or aggressive absorption. |
| Failed breakout | It may be UTAD or a normal failed range extension. |
| Support break | It may begin markdown or become a bear trap. |
Keep the label provisional until price confirms the outcome. A Wyckoff read should update as the chart changes, not stay fixed once the label is applied.
Does Wyckoff Distribution Still Work in Crypto?
Wyckoff distribution can still work in crypto as a framework for reading supply and demand, but crypto market structure makes false signals more frequent than the textbook suggests. Around-the-clock trading, fragmented exchange liquidity, perpetual futures, thin altcoin books, and social media narratives can all distort a pattern that was originally developed for equities trading during exchange hours.
Major assets generally produce cleaner structures than illiquid tokens because they have deeper markets, broader participation, and more consistent volume data. Bitcoin and Ethereum are commonly used for chart study, but no chart pattern removes market risk. A crypto-specific read should look beyond the candles:
- Whether the move appears consistently across major venues, not just one exchange.
- Whether open interest expands during the range in a way that matches the price behavior.
- Whether funding rates indicate crowded long exposure near resistance.
- Whether the asset has enough market depth for the signal to carry real weight.
- Whether on-chain claims about whale behavior actually match the chart.
Crypto exchange data helps explain why one chart may not tell the full story. Different venues show different wicks, volume, and liquidity around the same move, so a pattern that looks clean on one chart may be distorted on another. Crypto derivatives activity can compound this when crowded leverage meets thin liquidity and drives sharp moves that have nothing to do with the underlying supply-demand dynamic.
Decentralized exchanges create a separate problem. Pool depth, slippage, and routing can produce price movement that doesn't match a centralized order-book pattern at all. Large wallet movements and exchange inflows add context, but they don't prove distribution by themselves.
How To Use Wyckoff Distribution in Trading
Wyckoff distribution works best as a planning framework, not as a trigger for entering every suspected top. The framework helps organize the chart into range, test, confirmation, and invalidation, which is more useful for discipline than for generating trade signals.
A conservative process starts with observation, not prediction:
- Mark the prior trend, the range high, and the range low before applying any event labels.
- Identify repeated failed rallies and areas where price closes weakly after upside attempts.
- Compare the setup with the higher-timeframe trend before treating it as distribution.
- Define exactly where the bearish read becomes wrong, and write that down before acting.
- Journal the setup and its outcome to build a testable rule set over time.
- Backtest the rule set before using meaningful position size on live trades.
Short-timeframe trading adds execution pressure that the framework wasn't designed for. Spreads, order-book depth, platform outages, and fees all affect the result of short-term decisions. Understanding these mechanics is easier after you've reviewed what different crypto derivatives exchanges actually offer on execution, margin, and risk controls.
For traders newer to chart analysis and venue selection, crypto exchanges for beginners can help with the venue side of the equation. But a chart pattern is not a reason to enter a product or market you don't yet understand.
How to Spot a Fake Wyckoff Distribution Range Before It Burns You
Not every sideways top is distribution. Some of the most convincing Wyckoff setups in crypto history turned out to be reaccumulation, and the traders who shorted them got squeezed hard.
Here's what separates a genuine distribution range from a head fake:
1. The prior trend matters more than the range shape. Distribution should follow a mature, extended uptrend, usually months long. If you're trying to call distribution three weeks into a rally, the math is against you. The longer and stronger the prior markup, the more credible the distribution label.
2. Demand should be visibly exhausted, not just slow. A slow uptrend isn't the same as an exhausted one. In a genuine distribution range, rallies should show rising volume for less and less price progress. If price is drifting sideways but volume is healthy and demand is absorbing supply without stress, you may be looking at a flat reaccumulation.
3. The range should show lower highs on the recoveries. Each bounce back toward resistance should peak lower than the last. If the range keeps producing equal or higher recovery highs, demand is still competitive and the distribution label is premature.
4. Check the higher timeframe first. A range that looks like distribution on a 4-hour chart may just be noise inside a healthy uptrend on the weekly. Wyckoff analysis works best top-down. Weekly or daily context should match the shorter-timeframe read before you act on it.
5. Wait for the SOW before considering a short. The sign of weakness, a break of the range low with volume and a failed recovery, is the first real structural evidence that sellers have taken control. Entering before this event means shorting speculation, not confirmation.
6. Track open interest and funding rates. If funding rates are sharply positive and open interest is elevated near the range top, crowded long positioning is building. A sudden flush can look like a SOW but actually be a forced-liquidation sweep that resolves higher. Checking whether the move is driven by spot sellers or forced liquidations changes the interpretation.
The goal isn't to avoid every mistake. It's to avoid the expensive ones. A fake distribution range that you identify early costs you nothing. One you enter short before confirmation can cost your whole position.
False Signals, Leverage Risk, Fees, and Beginner Mistakes
False signals are common in Wyckoff distribution because the pattern is easy to recognize in hindsight and difficult to read in real time. A chart can look like a textbook top after the breakdown, but during the range it may still be genuinely unresolved.
A false UTAD is one of the most frequent traps. Price breaks above resistance, dips back into the range, and the trader marks it as Phase C. Then price reclaims the high and continues upward, proving the label was premature. A failed SOW does the same thing in reverse: support breaks briefly, buyers recover the range, and the apparent sign of weakness becomes a bear trap.
The failure points beginners hit most often follow a recognizable pattern:
- Labeling every sideways top as distribution without checking the prior trend.
- Ignoring reaccumulation as a possibility after a strong uptrend.
- Entering short positions before the range has confirmed weakness.
- Using leverage without a clearly defined level where the bearish read is wrong.
- Failing to account for fees, funding, spread, and slippage in the expected outcome.
- Trusting automated chart labels without reviewing the underlying price action.
Leverage makes every mistake more expensive. Crypto futures platforms and crypto derivatives exchanges expose traders to liquidation, funding costs, forced exits, and mark-price moves that can close positions before the setup has time to develop. A confirmed distribution range does not make a short position safe.
Venue selection is part of execution risk. Safer crypto exchanges reduce some operational concerns, but they don't remove market risk, slippage, or the chance that a stop order fills at a worse price than planned. Before any setup becomes actionable, check the execution environment:
- Fees and funding costs can change the expected result before the trade is even closed.
- Slippage during a volatile move can turn a correct read into a poor fill.
- Thin order books make stops execute worse than the chart suggests.
- Platform outages during volatile periods can block exits at the worst moments.
- Frequent trading increases tax reporting complexity, since the IRS requires digital asset transactions, including gains and losses, to be reported on a federal return.
Automation can help screen charts, but quant trading tools still need tested rules and ongoing review. A bot that labels every failed breakout as UTAD builds false confidence faster than evidence.
Liquidity fragmentation affects execution on both centralized and decentralized venues. Centralized order books can have gaps during volatile moves, while decentralized exchange pools carry slippage that scales with the size of the trade.
Wyckoff Distribution Example
A useful Wyckoff example doesn't require a current price call. It can use a hypothetical chart structure that starts with a strong advance, enters a volatile top range, fails above resistance, and later breaks support below the range.
Bitcoin and Ethereum are the most common major-asset charts used for Wyckoff study because they have deep enough markets to produce readable structures. Reviewing chart history on either asset can illustrate the sequence without requiring a live trade call. A basic read looks like this:
- Range setup: price rallies into a high-volume top, reacts sharply, then retests resistance with weaker volume and less follow-through.
- Confirmation: a later upthrust fails to hold, support breaks with volume, and the subsequent bounce cannot reclaim the midpoint of the range.
- Invalidation: price reclaims resistance and holds above it on sustained volume, which breaks the distribution thesis and requires the range to be relabeled.
Sequencing is the goal. A label becomes useful when it defines what would confirm the read and what would prove it wrong. If neither condition is stated before the trade, the pattern is a story rather than a framework.
FAQs
What does Wyckoff distribution look like?
Wyckoff distribution looks like a volatile sideways range after an uptrend, with repeated failed rallies, weakening demand on upside attempts, and a later support break if the pattern confirms. The clean textbook version includes phases A through E, but real crypto charts are usually less orderly and require more interpretation.
What is UTAD in Wyckoff distribution?
UTAD stands for upthrust after distribution. It is a late false breakout above range resistance that fails back into the range and can trap buyers who expected the uptrend to continue. The failure, not the breakout itself, is what makes it meaningful.
What is the difference between Wyckoff distribution and accumulation?
Wyckoff distribution is a potential topping range that forms after an advance. Accumulation is a potential bottoming range that forms after a decline. Distribution studies supply overwhelming demand near the highs. Accumulation studies demand absorbing supply near the lows.
Does Wyckoff distribution work in crypto?
Wyckoff distribution can work in crypto as a framework for reading supply, demand, and failed follow-through. It is less reliable when liquidity is thin, leverage is crowded, or exchange data gives an incomplete picture of where real buying and selling are happening.
What does failed Wyckoff distribution look like?
Failed Wyckoff distribution looks like a bearish range that cannot produce sustained markdown. Price may break support or produce a failed rally, then reclaim the range and continue higher. When that happens, the original distribution label was premature, and the range was likely reaccumulation.